|
Drawing curly arrows correctly and be aware of what each arrow means it is crucial for drawing reaction mechanisms correctly. Curly arrows are the language of organic chemistry and it is important to master using them. After many years of contact with undergraduate students at the level of Organic Chemistry III, I came to the realization that students "learn" to draw curly arrows mechanically without realizing what each curly arrow that they draw means. The art of drawing good curly arrows starts from the very beginning of Organic Chemistry courses when you learn about resonance forms. It is there that you need to put all your effort and master the art of curly arrows! Below it is a personal account on the method that I used, when I was 1st year undergraduate student (about ten years ago!) to master drawing curly arrows and which evolved to a great passion and love for organic chemistry (I now have a PhD on organic chemistry). First of all, you need to understand what a curly arrow is. There are two types of curly arrows. The "full arrow" and the "half arrow" or "fish hook" arrow (shown below in Figure 1). The former shows the movement of two electrons while the latter shows the movement of one electron. An arrow always begins from where there is electron density and finishes (points) to where there is deficiency of electron density.  Figure 1. Types of curly arrows. The other thing you need to know before start practicing with curly arrows is that the curvature of the arrow indicates on which atom the bond making occurs. In order to get this always right you need to draw a dotted line between the atoms that will form the new bond (in a rational geometry - resembling the geometry of the new bond). For better understanding please see Figure 2. 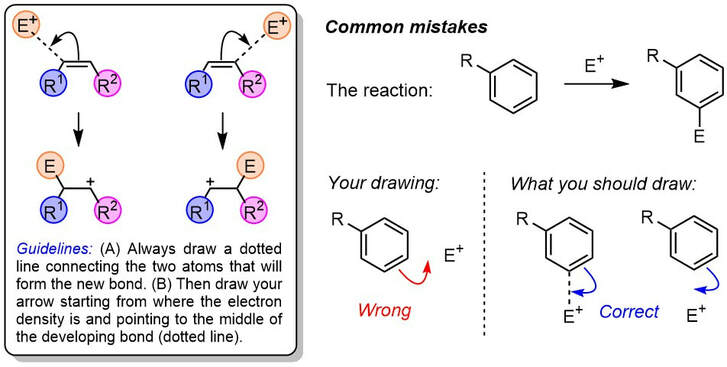 Figure 2. Curvature and direction of curly arrows. Those "rules" are the grammar of curly arrows!! Now, when it comes to learn how to move your curly arrows: the first thing you need to do is to master drawing resonance forms! You need to practice, practice, practice until you can play them on your fingers. And here it comes the secret of my method! When you very first start practicing, you need to draw the bonds that are moving as a pair of electrons and draw as well all the free electron pairs on all the atoms! And just keep practicing every single example like that. See Figure 3! 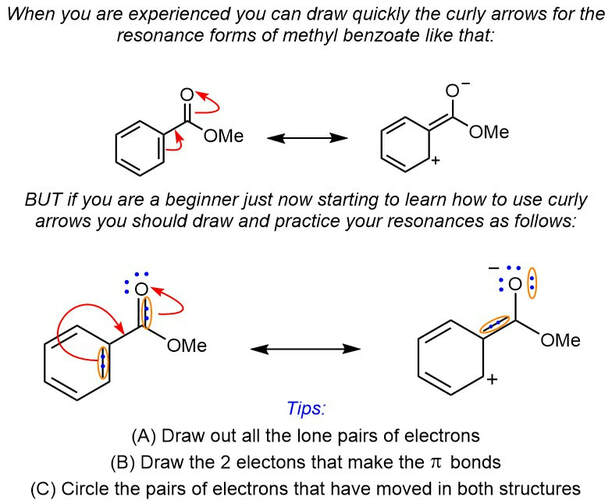 Figure 3. How to practice your resonances! With this method you keep track of all the electrons! You also keep reminding yourself that "this double bond that I am moving it is in fact a pair of electrons" and you can also assign the charges for each atom easier! Practice like that during your first year and you will remember me in the long run. The same applies for practicing simple organic reactions like the abstraction of an organic acid's proton from a base. See Figure 4 below. 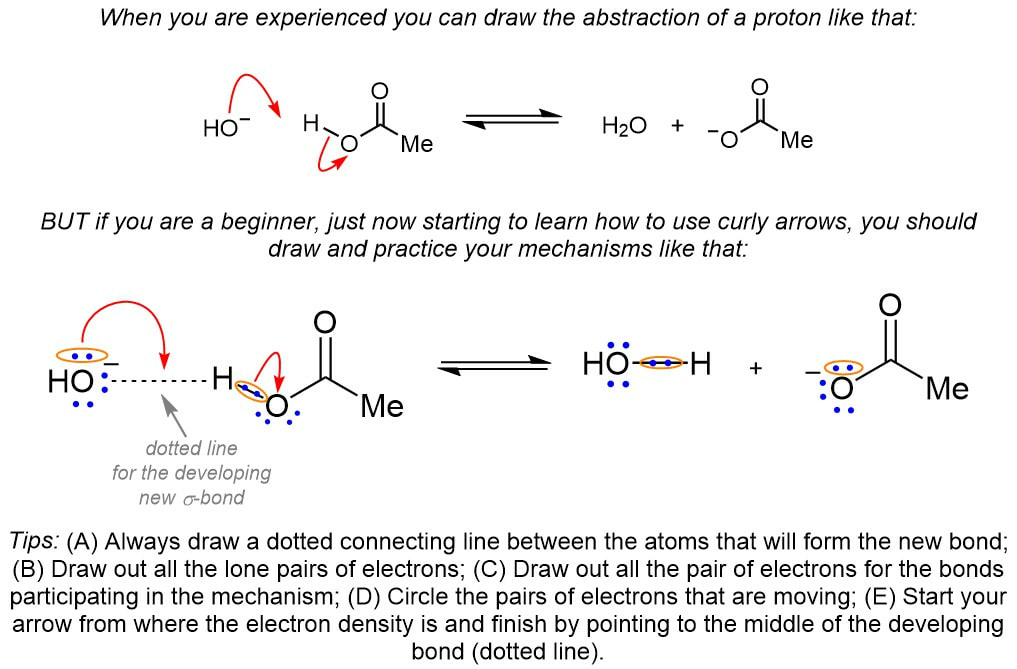 Figure 4. How to draw your mechanisms when you are a beginner. As simple as this practicing hack looks like, it is extremely efficient for learning your curly arrows and reaction mechanisms inside out! Give it a try!! Another great post with some additional useful details on drawing curly arrows can be found here https://www.ch.imperial.ac.uk/rzepa/blog/?p=11741. Are you a first year student? Did this practicing tip help you with using curly arrows? Are you a student at higher years? What was useful for you when you started working with curly arrows? Let us know your thoughts at the comments below! Author: Maria Koyioni, PhD
0 Comments
|
Maria Koyioni, PhD

ArchivesCategories |
 RSS Feed
